At WPBeginner we use WordPress SEO plugin by Yoast. We believe that it is the most complete SEO solution for your WordPress blog. With tons of features and options this plugin provides an alternate to the users of famous All in One SEO Pack. In this article, we will show you how to install and setup WordPress SEO by Yoast and utilize all the awesome features that comes built-in.
Features
First let’s take a look at the features this plugin has to offer:
- Post title and meta description meta box to change these on a per post basis.
- Taxonomy (tag, category & custom taxonomy) title and meta description support.
- Google search result snippet previews.
- Focus keyword testing.
- Meta Robots configuration:
- Easily add noodp, noydir meta tags.
- Easily noindex, or nofollow pages, taxonomies or entire archives.
- Improved canonical support, adding canonical to taxonomy archives, single posts and pages and the front page.
- RSS footer / header configuration.
- Permalink clean ups, while still allowing for Google Custom Search.
- Breadcrumbs support, with configurable breadcrumbs titles.
- XML Sitemaps with:
- Images
- Configurable removal of post types and taxonomies
- Pages or posts that have been noindexed will not show in XML sitemap (but can if you want them too).
- XML News Sitemaps.
- .htaccess and robots.txt editor.
- Ability to verify Google Webmaster Tools, Yahoo Site Explorer, and Bing Webmaster Tools
- Basic import functionality for HeadSpace2 and All in One SEO. (You can also use the SEO Data Transporter to transfer functionality from themes like Thesis, Headway, Genesis etc).
So after seeing all of these features, it is confirmed that this is by far the MOST COMPLETE WordPress SEO plugin. Joost combined his other plugins like RSS Footer, HeadSpace2, Yoast Breadcrumbs, and others to create this powerhouse plugin.
How to Install WordPress SEO Plugin by Yoast
First thing you need to do is install and activate WordPress SEO plugin by Yoast, see our guide on how to install a plugin in WordPress. Upon activation, you should see a new tab added in the admin panel called SEO with Yoast’s logo on it.

Now that you have installed and activated the plugin, let’s take a look at setting this bad boy up.
How to Setup WordPress SEO Plugin by Yoast
You should remember, that the settings that we select are the ones that we recommend. Other experts may have their own preferences and discretion, so advanced users can ignore anything that they do not like. If you are a beginner, and you want to use Yoast’s WordPress SEO plugin like we do, then please follow along the steps carefully.
Step 1. Data Transfer
Most of you probably have another WordPress plugin like All in One SEO pack, or a theme framework like Genesis, Thesis, or Headway dealing with your SEO data. If you want to successfully use this plugin, then you need to make sure that all of your previous data has been transported to this plugin before you deactivate the other one. To accomplish this, we recommend using SEO Data Transporter by StudioPress. If you’re setting this up on a new blog, then skip this step.
Setp 2. General Settings
Clicking on the SEO icon takes you to WordPress SEO by Yoast’s General settings page. You can take a tour here to learn more about the plugin. You can also reset your plugin to default settings from this page. There is a tracking option, checking it will send anonymous usage data back to plugin author. You can uncheck this box if you don’t want to share this information (we have it unchecked). Then there is a security option to disable advanced part of the WordPress SEO meta box. We recommend that you leave it checked. Checking it will prevent your authors from making changes like redirects and noindex which could create problem for you later on.

Step 3. Webmaster Tools
If you know a little bit about SEO, then you have probably heard that each of the popular search engines, Google, Yahoo, and Bing allow site owners to add their sites using webmaster tools area (see our guide on how to add your WordPress site to Google webmaster tools). Webmaster tools lets you see insights and other relevant data about your site from the specific search engines. In order to verify your site and see those exclusive data, you have to add a meta tag to your site, or upload a file. Most beginners are afraid to add meta tags, so Joost put this option in to ease the process. Simply add your meta code that you received from the search engines in the respective fields.

Step 4. Titles & Metas
Titles & Metas section under WordPress SEO has several tabs in it. We will cover each one of them.

1. General
Clicking on it will land you on the General tab. Here you can configure some site wide general settings. WordPress SEO can auto-detect whether it needs to re-write titles or not. So you can leave this as it is, usually it is unchecked. Check the meta keywords checkbox. Under clean up the head section you can safely check hide shortlink for posts. If you are not using a client or app to update your site, then you can also check hide RSD links and WLW Manifest Links.

2. Home Title
Next we will work on defining the title for our homepage. By default you will see these fields pre-filled with title-template. So what is the difference between a title and a title template, you may ask. In instances like your home page, you may want to create a static title, description, and keywords. But for posts, the title will vary from one post to another. Title templates allow you to define a way that the title and other meta information is pulled and organized. Let’s take a look at the image below for the home page settings. By default the template variables in the title field work fine for most website however you’re welcome to change it. The next option is to enter your site’s description. Once you are done, click on save settings button.

If you are using a static home page in WordPress, then you would have to edit the settings from the page edit screen.
3. Post Types Titles & Metas
By default WordPress comes with several post types such as post, page, revisions, attachment, and navigation menus. Users can also define their own custom post types. WordPress SEO allows you to set titles and meta for posts, pages, media, and other custom post types.
WordPress SEO automatically enters title template variables for all your post types and leaves your description and other fields blank. We recommend that you change the title templates where you only keep the actual title element and remove the sitename.
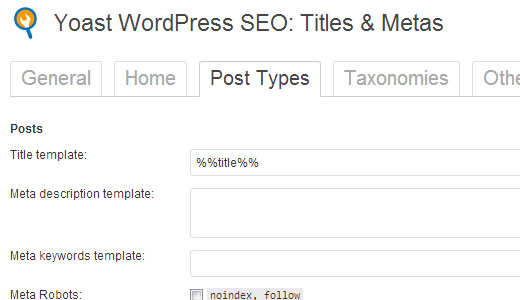
Remember WordPress SEO plugin also adds an SEO meta box in your post edit area. For maximum SEO benefits, we highly recommend you to manually enter title and descriptions for each post. Otherwise WordPress SEO will use the title as defined here and will automatically add description for your posts and pages.
Read our WordPress SEO Tip for Beginners on optimizing blog posts.
4. Taxonomies
On the taxonomies tab, you can configure titles and meta for Categories, tags, custom taxonomies, and post format archives. Default template variables should work for most sites. As for descriptions, please remember that WordPress SEO picks up descriptions from your categories and tags.

If you do not have any description for terms in your categories, tags, or custom taxonomies, then WordPress SEO does not add meta description in archives for these terms. Check out our guide on categories vs. tags.
5. Other
On the other tab you have title and meta settings for author archives, date archives, and special pages such as search and 404 pages. We recommended that you check disable author archives for single author blogs. If you are running a single author blog, then your main blog and the author archives contain exactly the same content. The setting is there to prevent duplicate content.
Leave other settings as they are and save changes.
Step 5. Social
As we said earlier, that WordPress SEO by Yoast is a powerhouse plugin and is packed with many features to provide the complete SEO package. One great feature of the plugin is that it integrates your site with Facebook, Twitter, and Google+ social platforms. Clicking on the Social link under the SEO menu will take you to setup these platforms. We will show you how to configure each of them.
1. Facebook
On the Facebook tab, first thing you need to do is check the box that says add open graph meta data. Checking this allows WordPress SEO to add Facebook open graph meta data in your website’s <head> section. This will help Facebook pick up the right thumbnail and page information when a post from your website is shared on Facebook.
The next option is to associate your website with a Facebook profile. This profile can be a user profile as well as a Facebook app (check out ‘Create a Facebook App’ section in our guide on how to add Facebook recommendation bar in WordPress). Adding a Facebook admin will give you access to Facebook Insights for your site.
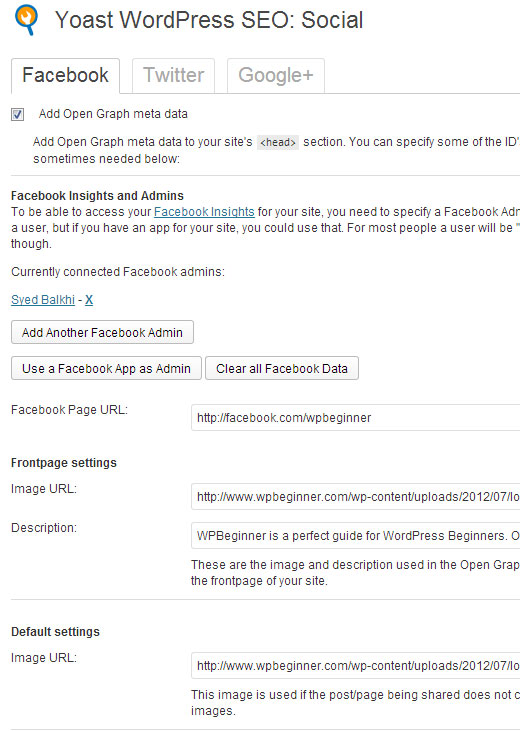
Enter your your Facebook page URL if you have one. The next option is to provide a thumbnail location for your home page and a description. This image and description will be used when someone shares the homepage of your site on Facebook. Lastly, provide a default thumbnail image URL. This image will be used for all articles that do not have a thumbnail or any other image in it.
2. Twitter
As for Twitter, you can add Twitter cards into your site’s head section and provide a Twitter user handle. This could be your website’s twitter account like @wpbeginner or your personal account @syedbalkhi.

3. Google+
On the Google+ tab, choose the user who should appear as the author of the homepage from a drop down menu. Remember that WordPress SEO plugin also adds a Google+ URL field in User » Your Profile page. So make sure that the user you select here has entered their Google+ URL in their profile and verified the authorship. The second option for this page is to enter your Google+ Publisher page. If you have created a Google+ page for your business enter its URL here, and then go to your Google+ business page and enter your website’s URL in about section.

Step 6. XML Sitemaps
Sitemaps are essential for your WordPress site. It is the quickest and easiest way to get indexed and notify search engines about your content. Sitemaps also allow you to tell search engines how to prioritize your content. WordPress SEO by Yoast makes it super easy to add XML sitemaps in WordPress. Make sure that the box that says ‘Check this box to enable XML sitemap functionality’ is checked. Also disable author/user sitemaps specially if you are running a single author blog. WordPress SEO will automatically ping Google and Bing however you can enable it to ping Yahoo and Ask.com as well. Lastly, you can exclude any post types or taxonomies that don’t want to appear in sitemaps.

By default WordPress SEO adds 1000 entries per page in your sitemap. However, if your website is facing memory issues, then you can reduce that number here.
Step 7. Permalinks
Just to be clear, we are talking about the Permalink settings in Yoast SEO tab, not in the setting tabs. This plugin adds on to those that are built-in to WordPress. This section does not allow you to create SEO Friendly URLs in WordPress. It assumes, that you have already done that. So let’s take a look at what type of features this section offers:
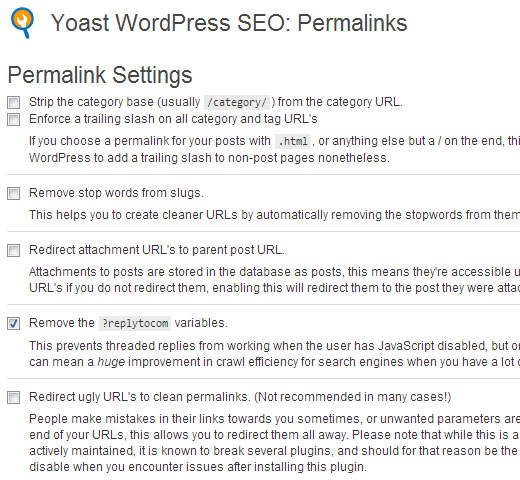
WordPress by default adds a category base in each url i.e /category/. By checking the first box, you can strip that part from your category URLs. This is something that a lot of people want. But you can leave it unchecked if you do not want your category urls and page urls to conflict if they are the same name.
Next feature is to enforce a trailing slash on all category and tag urls. If you are one of the users, who have .html at the end of their posts, then you probably want to select this option.
The next option is to remove stop words from permalinks. Stop words are common words used in plain language. Yoast believes that by removing these, you will create cleaner URLs. While it does make the URLs smaller, we disagree with Yoast. This is why we have left it unchecked.
Next option is to redirect attachment URLs to parent post. WordPress allows you to attach images and other media to posts. But all of those attachments get their own URLs which in most cases are unnecessary. Therefore by checking this box, you redirect all your attachment page URL to the original post URL.
The next option on the permalinks page is to remove ?replytocom variable from comment reply links. It disables the links for the users with javascript disabled. Most web crawlers when they visit your site have javascript disabled, so they do not see the URL and can quickly move on. This increases the crawl efficiency particularly if you are running a site with lots of comments.
Redirect ugly URLs to clean permalinks option is not needed in most cases. We advise you to ignore it unless you know what you’re doing.
The last option to configure on Permalinks page is canonical URL settings. We would recommend that you leave them as they are.
Step 8. Internal Links
This section of WordPress SEO is not about internal linking within your posts. It is actually about breadcrumbs which are great for internal linking because it defines a clean path or trail to the page you are on. These breadcrumbs also appear in search results giving your site extra advantage in the search.

First thing you need to do on internal links page under SEO is to enable Breadcrumbs. Then enter a separator you want to use between breadcrumbs. Enter an anchor text for your home page. You can add a prefix for the breadcrumb path, search, archives, and 404 pages. These prefixes will not appear in search but on your site.
Step 9. RSS Feeds
WordPress SEO plugin has an RSS Feeds section, which allows you to add backlinks to yourself in your feed content because most content scrapers are using your feeds to steal your content. This way, you will get backlinks from their site, and google will know that you are the original source. There are options to add your author link, Post link, blog link, and blog description. So get creative. This can also be used to add advertisement to your RSS feed.

For advanced users: How to Add Custom Content and Completely Manipulate your RSS Feeds.
Step 10. Import & Export
As you can see that we have spent a good amount of time getting these settings just right, so you probably want to export the settings as Backup (just incase if you accidentally mess things up in the future). You can also export settings to use it as an initial guideline for all of your future sites that you are going to use this plugin on.
**Note** There is an Edit tab below Import & Export section, but we will not cover that. Most beginners or even intermediates should not get close to that section.
Step 11: Customizing and Maximizing the Benefit
Just installing and setting up this plugin is not enough. In order for you to really maximize the benefit of this plugin, you need to customize the settings on per post basis. Now this would not be a chore if you do it every time you write a post. Let’s take a look at how you can maximize the benefits by customizing.
WordPress SEO for Individual Posts and Pages

On each post and page editor page, you will see this new box called WordPress SEO that has tons of fields like SEO Title, Meta Description etc. You should write a custom title, and meta description rather than letting it auto-generate. Sometimes your post title, and your SEO title might not be the same. Every time, you should write a custom Meta Description because the excerpt generator only picks up the first paragraph which might not be the most important one. Make sure you select a focus keyword, so you can get analysis on how strong your page is for that keyword. For more details check out WordPress SEO tip for beginners – how to optimize your WordPress blog posts.
Once you click Save the post, there is a tab called Page Analysis. This gives you even further insights about your specific post or page.

Use the free analysis as a reference point. Don’t kill yourself over it, but usually it is pretty accurate.
WordPress SEO for Archives (Category / Author / Tags)
You can override the Title Templates that we created in Step 5 to maximize the benefits. Simply Edit any Category, Tag, or Author to see the WordPress SEO settings added.
We hope that we covered every thing in this guide for WordPress SEO plugin by Yoast, and we hope that it helps you install and set it up the right way. If you still have questions about the setup, then please leave a comment below. For support queries, please utilize the official forum.
To leave a comment please visit How to Install and Setup WordPress SEO Plugin by Yoast on WPBeginner.
via WPBeginner http://feeds.wpbeginner.com/~r/wpbeginner/~3/Se_N4-lu5Nc/
WordPress Hosting Tips
No comments:
Post a Comment